|
<< Click to Display Table of Contents >> User Interface |
  
|
|
<< Click to Display Table of Contents >> User Interface |
  
|
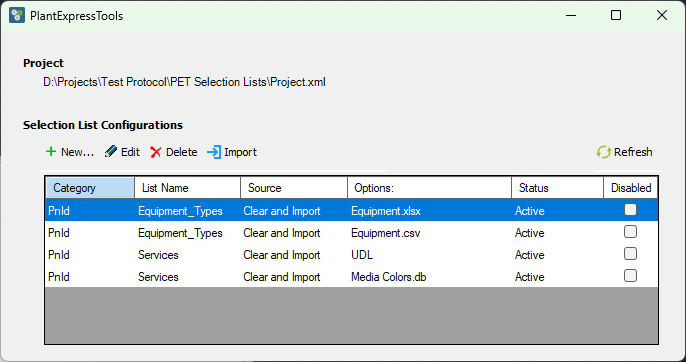
This chapter describes the main user interface of the Selection List function.

The user interface shows you the project at the top. Below that you have the following buttons:
Button |
Description |
|---|---|
New |
This allows you to create a new Selection List configuration (e.g., New List using Excel). |
Edit |
This allows you to edit an existing Selection List configuration. Make sure you select the Selection List configuration first. You can also edit a Selection List configuration by double-clicking on it. |
Delete |
This allows you to delete an existing Selection List configuration. Make sure you select the Selection List configuration first. Multi-selection is not possible. |
Import |
This allows you to import existing Selection List configuration from some other location or project. A file dialog will open where you can select one or more configuration files to be imported. The files will be copied into the current project. |
Refresh |
This will reload the Selection List configuration files in case you have edited them manually. |
The columns in the table have the following meaning:
Column |
Description |
|---|---|
Category |
This shows either PnId or Piping to show whether a Selection List configuration is for P&ID drawings or 3D drawings. |
List Name |
This shows the name of the Selection List which will be updated. |
Source |
This shows if the values of the Selection List will be Cleared and Imported or if the values of the Selection List will be Added/Updated. Actually, this should be under Options. |
Options |
This shows where the data is coming from. Actually, this should be under Source. |
Status |
This shows either Active, Disabled, or Failed in case of an invalid Selection List configuration. To get the details of the error you just edit the Selection List configuration to see what the error is about. |
Disabled |
This allows you to deactivate or activate Selection List configuration. Multi-selection is not possible. |
Next Chapter: Setup